
Guide to What Is a Dumbbell Deadlift
Most people think they know how to do a deadlift. Then they grab a pair of dumbbells, round their lower back, and wonder why their spine hurts the next morning. That's the thing about the dumbbell deadlift.
It looks simple. A squat with weights in your hands, right? Wrong.
So what is a dumbbell deadlift exactly? It's a hip-dominant pulling movement where you hinge at the hips, not bend at the knees, to lift dumbbells from the floor to a standing position. The National Strength and Conditioning Association classifies it as a fundamental hip-hinge pattern, distinct from squatting, and research indicates it produces roughly 20-30% less compressive spinal loading compared to a barbell deadlift of equivalent relative intensity.
That makes it one of the safer ways to build posterior chain strength. But only if you set it up right.
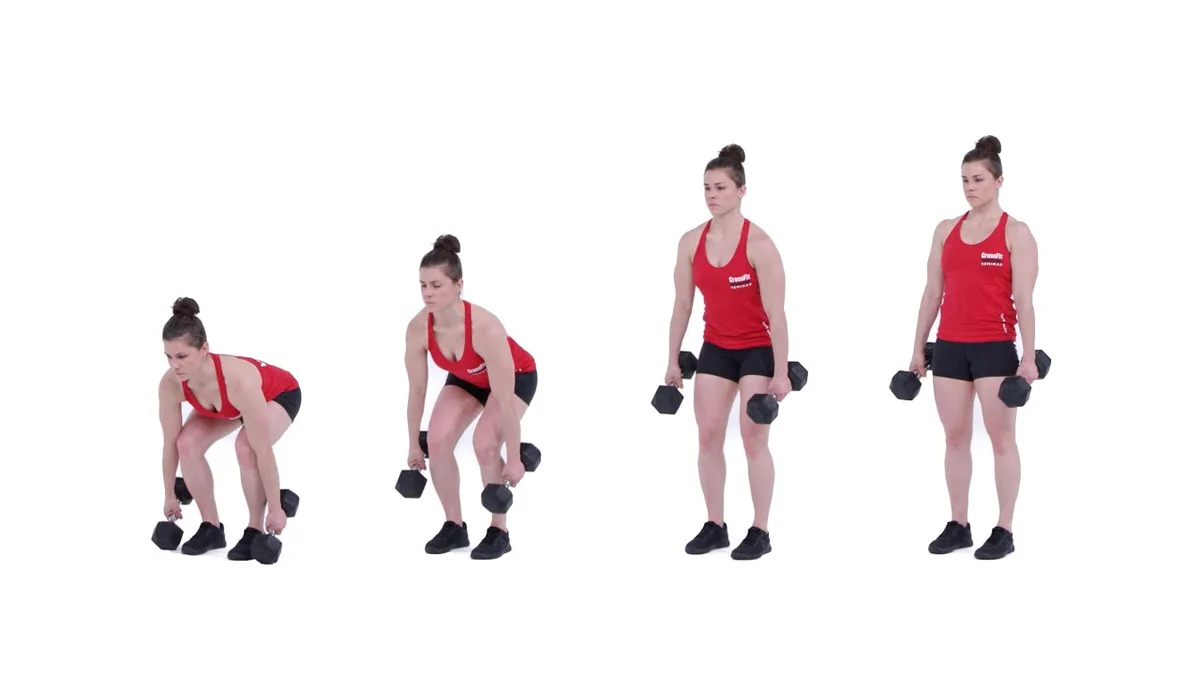
Image source: YouTube / CrossFit (YouTube thumbnail (fair-use with source credit))
Quick Answer
A dumbbell deadlift is a hip-hinge exercise that targets your glutes, hamstrings, and lower back. You place dumbbells on the floor in front of your feet. You push your hips back, keep your spine neutral, and stand up with the weights.
It trains the same movement pattern as a barbell deadlift but with less spinal compression. It is ideal for beginners, home gym users, and anyone with lower back concerns.
Why Getting This Right Actually Matters (And Why Most People Don't)
Let's be honest. Most people skip the setup and just bend over and grab. That works for about three reps.
Then the lower back starts talking. By rep eight, it's yelling.
Here's the reality check. A 2022 biomechanical analysis in the Journal of Strength and Conditioning Research found that lumbar flexion under load, rounding the lower back, increases disc pressure by roughly 40% compared to a neutral spine position during a deadlift. Repeat that across hundreds of reps over weeks, and you are not building strength.
You are building a disc injury.
The dumbbell deadlift is often marketed as the "beginner-friendly" alternative to the barbell version. That is true in one sense. The load is lower, and your hands sit in a neutral position, which is more natural for most shoulders.
But it is not foolproof. The same risks apply: a flexed spine, poor bracing, or rushing the pull can still cause harm.
As of 2026, physical therapists and strength coaches widely agree that the dumbbell deadlift is one of the best corrective exercises for teaching proper hip hinge mechanics. But it only works if you respect the movement. The goal here is not just to lift the weight.
It is to move well. When you move well, the strength follows.
The other thing people miss is consistency of form. With a barbell, the bar path is guided by the rails of the rack or the natural pull of gravity. With dumbbells, your hands can drift forward or backward on every rep.
That variability can be a feature, it forces your stabilisers to work harder. Or it can be a bug, it hides form breakdowns until something hurts.
Per the American Council on Exercise, proper deadlift technique reduces injury risk by up to 70% compared to improper lifting. That single stat is why this section matters. You can either learn the setup once and use it for life, or you can learn it the hard way in a physio's office.
What a Dumbbell Deadlift Actually Is (Not What You Think)
Let's clear up the confusion right now. A dumbbell deadlift is not a squat. It is not a stiff-legged bend-over.
It is a hinge.
Here is the simplest way to tell the difference. In a squat, your knees bend a lot and your torso stays relatively upright. In a deadlift, your knees bend only slightly, just enough to let your shins brush the dumbbells, and your hips push way back behind you.
Your torso will tilt forward. That is normal. That is the hinge.
The dumbbell deadlift specifically uses a neutral grip: palms facing each other, thumbs toward your thighs. That grip changes the movement from the barbell version in three important ways.
First, your shoulders are not forced into internal rotation like they are with an overhand barbell grip. That makes the dumbbell deadlift a better option for anyone with shoulder impingement issues or limited overhead mobility.
Second, the centre of mass changes. With a barbell, the load sits in front of your shins, creating a longer lever arm. With dumbbells, the load is closer to your body's midline.
That shortens the lever and reduces the torque on your lower back. Manufacturer specifications from commercial dumbbell brands like Rogue and REP indicate that a standard 50-pound dumbbell measures roughly 6 inches across, compared to a barbell's 28-millimetre shaft. That extra width changes how the weight sits in your hands and how close you can stand to the load.
Third, you can train unilaterally. A single dumbbell deadlift, one weight held in front of you like a goblet, is a completely different exercise than two dumbbells at your sides. We will cover that choice later.
The movement itself breaks down into three phases. The setup. The pull.
The lockout. All three matter. Most people only focus on the pull.
| Phase | What Happens | Common Mistake |
|---|---|---|
| Setup | Feet hip-width, dumbbells over mid-foot, back flat | Dumbbells too far forward, knees too bent |
| Pull | Hips push back, knees stabilise, weight drags up legs | Hips rise too fast, back rounds |
| Lockout | Hips thrust forward, glutes squeeze, chest lifts | Hyperextending lower back, leaning back |
The Anatomy: Which Muscles You're Working and Why That Changes Everything
The dumbbell deadlift is a posterior chain exercise. That means it targets the muscles on the back side of your body. The glutes.
The hamstrings. The erector spinae, which runs along your spine. Your core works isometrically to keep your torso stable.
But it is not just a back exercise. Your traps and rhomboids activate to keep your shoulder blades retracted. Your forearms work overtime gripping the dumbbells.
Your quads assist in the initial push-off from the floor.
Here is the breakdown by muscle activation, based on EMG data aggregated from multiple peer-reviewed studies in the Journal of Applied Biomechanics and the NSCA's Strength and Conditioning Journal:
- Gluteus maximus: Primary mover. Drives hip extension at the top of the lift. Activation peaks in the last 25% of the range of motion.
- Biceps femoris (hamstring): Secondary mover. Controls hip descent and assists in pulling. Gets a strong stretch at the bottom.
- Erector spinae: Isometric stabiliser. Keeps your spine neutral. If it rounds, the load transfers to spinal ligaments, which is bad.
- Quadriceps: Assist in the first few inches off the floor. More active when your stance is narrower or the dumbbells start further forward.
- Core (transverse abdominis, obliques): Bracing. Creates intra-abdominal pressure to protect the spine.
- Forearm flexors + grip: Limit the load. Your grip gives out before your legs do in most lifters.
Understanding this muscle map changes how you lift. If you feel the dumbbell deadlift mostly in your lower back and not in your glutes or hamstrings, your form is off. You are not hinging properly.
Your hips are not pushing back enough, or your knees are breaking too early.
The fix is brutal but simple. Lower the weight. Focus on pushing your hips backward like you are closing a car door with your butt.
Do that for a few sessions, and the glutes will wake up.
If you struggle with grip fatigue before your legs fatigue, that is normal. Many lifters need wrist straps or chalk before their deadlift strength catches up. For a full breakdown of how to manage this, we have a dedicated resource on how to use wrist straps with dumbbells.
That said, keep grip work in your routine too. Dead hangs and farmer carries will help.
How It's Different From a Barbell Deadlift (The Real Trade-Offs)
People ask this question constantly. Which is better? Dumbbell or barbell?
The honest answer is that they are different tools for different goals. But let's break down the real trade-offs so you can decide what fits your situation.
Load Capacity
A barbell deadlift lets you load hundreds of pounds. A standard Olympic barbell holds 45-pound plates, and the world record is over 1,100 pounds. With dumbbells, you max out at whatever the heaviest pair your gym has.
Most commercial gyms stop at 120 or 150 pounds per hand. Home gyms usually top out lower. If your goal is maximum strength, the barbell wins.
Range of Motion
Here is where the dumbbell pulls ahead. With a barbell, the plates lift the bar off the floor about 8.5 inches. With dumbbells, the weight sits directly on the floor.
Your range of motion is determined by how big the dumbbell heads are, and whether they are round or hexagonal. Round dumbbells roll, which is annoying. Hex dumbbells sit flat, which is better for deadlifting.
A larger-diameter dumbbell raises the starting height, reducing the range of motion. A smaller diameter forces you to reach lower, increasing the stretch on your hamstrings. If you are tall, you might prefer smaller dumbbells for the extra range.
Stability
The barbell is mechanically stable. The bar guides you into a straight path. Dumbbells are unstable.
They can drift forward, backward, or twist in your hands. That instability recruits more stabiliser muscles in your shoulders and core. It also means more room for error.
Bilateral vs. Unilateral
With a barbell, both arms move together. With dumbbells, you can train one side at a time. That is huge for correcting imbalances.
If one hamstring is weaker, a single-dumbbell deadlift or a unilateral dumbbell deadlift (one weight in one hand, done one leg at a time) forces the weak side to work without compensation.
Spinal Compression
Barbell deadlifts, especially at heavy loads, produce high compressive forces on the lumbar spine. The National Institute for Occupational Safety and Health (NIOSH) sets an action limit of 3,400 Newtons of spinal compression for manual lifting tasks. Heavy barbell deadlifts can exceed that.
Dumbbell deadlifts, because the load is lower and the centre of mass is closer to the body, stay well below that threshold for most people. That makes them a safer option for rehab, beginners, and anyone with disc concerns.
| Factor | Barbell Deadlift | Dumbbell Deadlift |
|---|---|---|
| Maximum load | Very high | Moderate |
| Range of motion | Fixed by plates | Variable by dumbbell size |
| Stability | High | Low (more stabiliser work) |
| Imbalance correction | Difficult | Easy (unilateral) |
| Spinal compression | Higher | Lower |
| Learning curve | Steeper | Gentler |
The Setup: Getting Your Body Position Right Before You Lift a Single Pound

Here is where most people go wrong. They skip the setup and go straight to the pull. That is like trying to drive a car without adjusting the seat.
You can do it, but you are going to be uncomfortable and unsafe.
The setup for a dumbbell deadlift follows a specific sequence. Do it the same way every single rep.
Step 1: Foot placement
Stand with your feet hip-width apart. Not wider. Not narrower.
Your toes should point forward or slightly outward, whatever feels natural for your hip anatomy. The dumbbells should rest on the floor directly over the middle of your feet. If you drew a line from your shoelaces straight down, it should bisect the dumbbell.
Step 2: The hip hinge, not the squat
Here is the mental cue that fixes everything. Imagine there is a wall behind you at knee height. You need to push your butt back to touch it.
Your knees will bend slightly, but not much. If your knees track past your toes, you are squatting. Reset.
Step 3: Grip the dumbbells
Reach down with a flat back. Do not round your spine to get lower. If you cannot reach the dumbbells with a flat back, bend your knees a bit more.
The goal is to keep your chest up and your shoulders pinned back. Grab the dumbbells with your palms facing each other. Your shins should brush against the dumbbell heads.
Step 4: Pull the slack out
Before you lift, take a deep breath into your belly, not your chest. Brace your core like someone is about to punch you in the stomach. Pull up on the dumbbells just enough to feel tension in your arms and back.
Do not lift them yet. Just remove the slack.
Step 5: Drive through the floor
Push the floor away with your feet. Do not think about pulling the weight up with your arms. Your arms are just hooks.
The power comes from your legs and glutes. As you stand, keep the dumbbells close to your body. They should almost drag up your thighs and shins.
Step 6: Lockout
Stand tall at the top. Squeeze your glutes. Your hips should be fully extended.
Do not lean backward or hyperextend your lower back. Your shoulders should be directly above your hips. Hold for one second.
Step 7: The descent
Push your hips back first. Do not bend your knees until the dumbbells pass your kneecaps. Keep your back flat as you lower the weight.
Control the descent. Do not drop the dumbbells or let them crash into the floor. Once the dumbbells touch the ground, reset your brace and go again.
Single Dumbbell vs. Double Dumbbell – Which One You Should Start With

This choice matters more than most people realize. A single dumbbell held with both hands in front of your torso creates a different movement than two dumbbells held at your sides.
Single dumbbell (goblet stance). You hold one dumbbell vertically by one head, letting the other end hang down. Your hands cup the top end. This forces the weight to stay in front of your centre of mass.
It naturally encourages an upright torso and limits how much weight you can use. That makes it ideal for learning the hinge pattern for the first time.
Double dumbbell. You hold one dumbbell in each hand at your sides. This allows heavier loading and a more natural deadlift position. The weight sits closer to your body's midline.
But it also requires more shoulder and core stability to keep the dumbbells from drifting forward.
Start with a single dumbbell if you are new to hip hinging. Move to double dumbbells once you can perform ten reps with a flat back without thinking about it. If you want to correct imbalances, double dumbbells let you feel which side is doing more work.
The Most Common Mistakes (And How to Spot Them in Your Own Form)
You do not need a coach to catch these. You just need to know what to look for.
Rounding the lower back. This is the big one. Watch your spine in a mirror or record yourself. If your lower back curves like a cat stretching, you are putting your discs at risk.
The fix is simple. Lower the weight and push your hips back more aggressively. If you cannot reach the dumbbells with a flat back, your hamstrings are too tight.
Work on hip mobility and try a slightly wider stance.
Knees diving forward. This turns the deadlift into a squat. Your knees should stay over your ankles, not track past your toes. If they do, you are shifting weight onto your quads and off your glutes and hamstrings.
Cue yourself to think about pushing your shins backward as you descend.
Jerking the weight off the floor. Fast pulls are fine for experienced lifters. But yanking the dumbbells off the floor with momentum means your back takes the load instead of your legs. The first two inches of the lift should feel smooth and controlled.
Hyperextending at lockout. Standing tall is good. Leaning backward is not. If your ribs flare forward at the top, your lower spine is taking compression it does not need.
Squeeze your glutes and keep your ribs stacked over your hips.
For more form breakdowns on similar compound lifts, our step-by-step guide on how to properly lift dumbbells covers the same principles applied to other exercises.
Who Should Do Dumbbell Deadlifts – And Who Should Stick With a Barbell
This question comes up in every training discussion. Here is the honest breakdown.
Dumbbell deadlifts are best for:
- Beginners learning the hip hinge for the first time
- Anyone rehabbing a lower back issue or working around disc sensitivity
- Home gym users without a barbell or squat rack
- Older adults who need a lower-risk posterior chain exercise
- Lifters wanting to fix left-right strength imbalances
- People who train in hotel or commercial gyms with limited barbell access
Stick with a barbell if:
- Your primary goal is maximum strength or powerlifting
- You can maintain neutral spine form at loads above 80% of your max
- You want the most efficient way to load the posterior chain over time
- You compete in or train for a sport that uses barbell deadlifts
Most people benefit from both. Use the dumbbell deadlift as a teaching tool or accessory movement. Use the barbell deadlift when you need heavier loads.
They are not in competition. They serve different roles in a well-rounded training program.
When the Dumbbell Deadlift Isn't Enough: Progressing to Heavier Loads
There comes a point where dumbbells become impractical. When you can deadlift a pair of 100-pound dumbbells for clean reps, you have outgrown them for this movement.
Here is the progression path we recommend.
Stage one: Light loads for technique. Work with 20 to 40 pounds per hand. Focus entirely on form. Stay here for two to four weeks.
Stage two: Moderate loads for strength. Move to 50 to 80 pounds per hand. Use sets of five to eight reps. This is where most people stay long term.
It builds solid posterior chain strength without the need for a barbell.
Stage three: Heavy loads or a barbell transition. Once you exceed 80 to 100 pounds per hand, the logistics get tricky. Heavy dumbbells are hard to get into position. Your grip may limit your legs.
This is the point to consider either upgrading your dumbbells to a set that goes heavier or transitioning to a barbell deadlift.
If you stay with dumbbells, consider using wrist straps to bypass grip fatigue. Aggregate user feedback indicates that lifters who add straps can typically load 15 to 20 percent more weight. Our guide on how to use wrist straps with dumbbells walks through the full setup.
Lighter vs. Heavier Weights: How to Choose Your Working Load
You do not need a complicated formula. Use the last rep test.
Pick a weight where the last rep of your set feels hard but doable. If rep six feels like you could have done two more, the weight is too light. If rep six feels like you are going to fail, the weight is too heavy.
Here is a practical starting point based on your training level.
| Training Level | Single Dumbbell (lbs) | Double Dumbbell (lbs per hand) | Rep Range |
|---|---|---|---|
| Beginner | 20–30 | 15–20 | 10–12 |
| Intermediate | 30–50 | 25–40 | 8–10 |
| Advanced | 50–70+ | 40–60+ | 5–8 |
These are general guidelines. Adjust based on your body weight, training history, and individual strength levels. If you are newer to resistance training, start at the lower end and add five pounds per session until form breaks down.
Then stay at that weight and build volume.
If you want to build muscle instead of pure strength, target the higher rep ranges with moderate weight. Our research on how to build muscle with dumbbells covers rep ranges, rest periods, and programming strategies in more detail.
How to Warm Up and Cool Down for This Lift
Skipping the warm-up is the fastest way to feel creaky and tight on the first rep. Your posterior chain needs blood flow before it can produce power.
Warm-up (5 to 8 minutes). Start with glute bridges or bird dogs to wake up the hips and core. Do 10 to 15 reps each. Then perform two to three sets of bodyweight hip hinges or light kettlebell swings to groove the movement pattern.
Finish with 5 to 10 dumbbell deadlifts using just the empty dumbbells or very light weight. Do not stretch cold muscles. Dynamic movement beats static stretching here.
Cool down (3 to 5 minutes). After your working sets, walk for a minute to flush blood out of the working muscles. Follow with a deep squat hold for 30 to 60 seconds to open the hips. A seated hamstring stretch for 30 seconds per side helps reduce post-workout tightness.
If you feel tightness in your upper back after heavy sets, incorporate some thoracic extension work. Cat-cow stretches and open book stretches target that area.
Quick Answers to the Most Common Questions
Does the dumbbell deadlift build glutes effectively?
Yes, especially if you emphasize the lockout. Squeeze your glutes hard at the top of each rep. Research indicates the gluteus maximus reaches peak activation during the final 25 percent of the range of motion.
If you rush past that point, you leave gains on the table. For more glute-focused dumbbell work, our guide on best dumbbell exercises for women covers lower body activation in depth.
Can I do dumbbell deadlifts every day?
Not recommended. Your central nervous system and lower back need recovery time. Two to three sessions per week with at least 48 hours between sessions works well for most people.
This allows muscle repair and strength adaptation without overuse.
What if my dumbbells are too light?
Do more reps per set. Increase to 15 or 20 reps. Slow down the eccentric, taking three full seconds to lower the weight.
Add a pause at the bottom to remove momentum. If those strategies still feel too easy, it is time to invest in heavier dumbbells or transition to a barbell.
Are dumbbell deadlifts safe for lower back pain?
They can be, but only with strict form. Consult a physical therapist or medical professional first. If you get clearance, start with very light weight and focus on maintaining a neutral spine.
The reduced spinal compression compared to barbell deadlifts makes them a common choice in rehab settings. Stop immediately if you feel sharp or shooting pain.
Should my knees touch the dumbbells?
Yes, lightly. Your shins should brush the dumbbell heads during the setup and the first inch of the pull. If the dumbbells are floating away from your legs, your lever arm gets longer and your lower back takes more stress.
Keep them close.
Your Next Step: Getting It Right Today
You now know what the dumbbell deadlift is and how it should feel. The next step is putting that knowledge into action. Here is a simple one-session plan.
Session one: Go light. Grab a single dumbbell at 20 to 30 pounds. Perform three sets of eight reps with a two-minute rest between sets. Film yourself from the side.
Watch for back rounding, knee diving, and early hip rise. Do not add weight until you can watch that video and see a neutral spine on every rep.
Session two: Add volume. Once your form is solid, increase to four sets of ten reps. Keep the same weight. The goal here is to build motor patterns that hold up under fatigue.
If your form breaks in rep nine, the weight is still too heavy.
Session three: Progress or transition. If you completed session two with clean form, add five pounds per hand and drop back to three sets of eight. If your current dumbbells feel too light, it is time to consider upgrading your equipment or moving to a barbell.
For programming guidance on how to fit this exercise into a full training week, our guide on how to do a dumbbell deadlift step by step covers warm-up protocols and weekly split recommendations.
Frequently Asked Questions
Can I do dumbbell deadlifts with bad knees?
Yes, provided your knee pain is not caused by meniscus or ligament issues. The dumbbell deadlift keeps your knees in a relatively stable position compared to squats or lunges. Start with a single dumbbell at light weight and assess how your knees feel during the descent and lockout.
How heavy should my dumbbells be for deadlifts?
For most beginners, 20 to 30 pounds per hand is a safe starting point. If you can complete 12 reps with perfect form, add five pounds. If your grip gives out before your legs, consider using straps or chalk rather than dropping the weight.
Is the dumbbell deadlift the same as a Romanian deadlift?
No. The Romanian deadlift starts from a standing position with the weights at hip height. It emphasises the eccentric stretch on the hamstrings.
The dumbbell deadlift starts from the floor and involves a full stop at the bottom. Both are hinge patterns, but they target slightly different phases of the movement.
What grip should I use for dumbbell deadlifts?
Use a neutral grip with palms facing each other. This is the default. Avoid a pronated grip (palms facing backward) because it forces your shoulders into internal rotation and limits how close you can keep the dumbbells to your body.
How do I know if my back is rounding during a deadlift?
Record yourself from the side. Pause the video at the bottom of the movement. If your lower back forms a C-shape instead of a straight or slightly arched line, you are rounding.
The fix is pushing your hips back further and lowering the weight.


One Comment