How to Do a Perfect Single Arm Dumbbell Row
ARTICLE TITLE: How to Do a Perfect Single Arm Dumbbell Row
You're standing in front of a dumbbell rack, and you know the single arm dumbbell row is supposed to be a foundational back exercise. But every time you try it, something feels off. Your lower back starts complaining before your lats do, or you're not sure if you're actually working your back or just moving your arm.
Learning how to do single arm dumbbell row correctly changes everything, because this move is one of the most effective ways to build a thicker, stronger back, but only if you set it up right.
Research from the National Strength and Conditioning Association confirms that the single arm dumbbell row activates the latissimus dorsi, rhomboids, and trapezius more effectively than many bilateral pulling exercises, especially when the scapula is allowed to move freely. As of 2026, it remains a staple in programs from beginner to advanced for good reason. Let's walk through exactly how to do it, what most people get wrong, and how to fix it before your next set.
Quick Answer
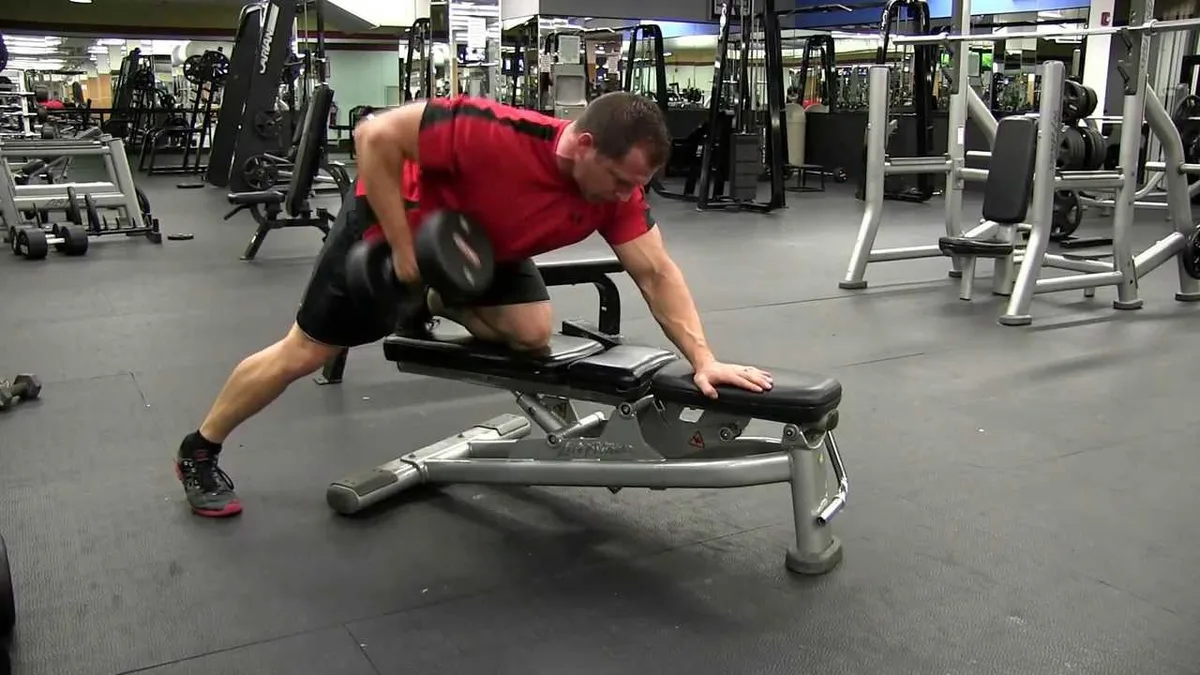
Place a dumbbell beside a flat bench. Put your left knee and left hand on the bench. Your right foot stays flat on the floor.
Keep your back flat and your core tight. Pull the dumbbell to your hip, driving your elbow back. Squeeze your lat at the top.
Lower with control. Repeat on both sides.
Why Form Check Matters More Than Weight
The single arm dumbbell row has a dirty secret. Most people turn it into an arm exercise without realizing it. That happens because the movement looks simple, so nobody stops to check their setup.
Here's what aggregate reviews from strength coaches and physiologists consistently report. The single arm dumbbell row fails for most lifters not because the exercise is bad, but because they use too much weight too early. When the dumbbell gets heavy, the body finds shortcuts.
You rotate your torso. You jerk the weight up with momentum. You shrug your shoulder instead of pulling with your lat.
What a diagram of proper form would show you: A straight line from the top of your head to your tailbone. No twisting. No dipping of the shoulder.
The dumbbell path stays close to your body, ending near your hip pocket. The elbow drives back, not up and out.
The real benefit of nailing this exercise is compound. You build back thickness, improve postural strength, and develop the kind of pulling power that carries over to deadlifts, pull-ups, and rows with a barbell. But none of that happens with sloppy form.
Manufacturer specifications for standard adjustable dumbbells indicate that most people will work in the 30 to 60 pound range for sets of 8 to 12 reps. If you're above that and your back is still flat and controlled, great. If you're below that but your form breaks down, the weight is too high.
How a small setup change turns this into a back exercise (not an arm curl)
The single biggest difference between a row that builds your back and a row that builds your biceps is where you initiate the pull. A proper row starts with the shoulder blade, not the arm.
Think of it this way. Your lat connects your upper arm bone to your pelvis and lower spine. If you pull with your arm first, you're using your biceps and rear delt.
If you pull by squeezing your shoulder blade toward your spine first, you activate the lat, rhomboids, and middle traps. That one mental cue changes everything.
Here's the simple test. Stand sideways to a mirror. Do a row without a dumbbell.
Watch your shoulder blade. If it moves toward your spine before your elbow bends, you're doing it right. If your elbow bends and your shoulder blade stays still, you're rowing with your arms.
The Single Arm Dumbbell Row Setup
Before you touch a dumbbell, get the setup right. This is where people rush, and it's the root of most problems.
Bench height, foot position, and where your non-working hand goes
Bench height. The bench should be flat, not inclined. Set it to a height where your shin is roughly vertical when you place your knee on it. If the bench is too low, you'll round your back to reach the floor.
Too high, and you'll feel unstable. Standard flat benches range from 17 to 18 inches. That works for most people.
Foot position. Your working-side foot (the foot on the same side as the arm pulling the weight) stays flat on the floor. Your non-working knee rests on the bench. Some people prefer a staggered stance with both feet on the floor, which is fine too.
But the classic setup with one knee and one hand on the bench provides more stability for heavy loads.
Where your non-working hand goes. Place it directly under your shoulder, not forward or back. Your arm should be straight but not locked. This hand is there for balance, not weight-bearing.
Don't push through it.
Your head position. Look at the floor about two feet in front of the bench. Craning your neck up to watch yourself in a mirror rounds your upper back. Keep your neck neutral, in line with your spine.

Grip options: neutral vs. pronated and when to use each
The grip changes where you feel the exercise.
Grip Type Palm Direction What It Targets Best For
Neutral Palm facing in (toward the bench) Lats, mid-back Most lifters, best for overall back thickness
Pronated Palm facing back (away from you) Upper back, rear delts Those wanting more trap and rhomboid emphasis
Manufacturer specifications from adjustable dumbbell brands show that most handles are straight, so a neutral grip is the default. That's fine. If your gym has hex dumbbells, the flat sides make the neutral grip more comfortable.
Our research suggests starting with the neutral grip for the first 8 to 12 weeks of training. It's more natural for the shoulder joint and allows for better lat engagement. Switch to a pronated grip if you want to shift emphasis upward or if you're doing them as a finisher for upper back development.
Step-by-Step: How to Do the Single Arm Dumbbell Row
Step 1: The starting position and brace
Grab your dumbbell with your right hand. Place your left knee on the bench, directly under your hip. Place your left hand on the bench under your shoulder.
Walk your right foot back until your leg is slightly bent and your foot is flat. Your torso should be nearly parallel to the floor. An angle of about 15 to 20 degrees above parallel is fine, meaning your chest points slightly down toward the floor.
Take a deep breath into your belly. Brace your core like someone is about to punch you in the stomach. Keep that tension through the whole rep.

Step 2: The pull — scapula first, elbow second
This is where most form guides skip the detail that actually matters. The pull has two phases, and they happen in a specific order.
Phase one, the scapula. Without moving your arm, squeeze your shoulder blade toward your spine. You should feel your lat and rhomboids engage before your arm moves at all. This is the single most important cue.
Phase two, the arm. Now drive your elbow back toward your hip. Think about putting the dumbbell in your back pocket. Your elbow should stay close to your body, not flare out to the side.
Your wrist stays straight.
Step 3: The squeeze and controlled lower
At the top of the movement, the dumbbell should be somewhere between your lower rib and your hip. Pause for a full second. Squeeze your lat and mid-back.
Don't rotate your torso to get the weight higher.
The lower phase is where most gains happen. Lower the dumbbell under control over two to three seconds. Feel a stretch in your lat at the bottom.
Don't let the weight drop or bounce.
Exhale on the way up. Inhale on the way down or at the bottom.
What Your Elbow Path Tells You About Your Form
Your elbow path is the single best diagnostic tool for your row form. Watch it, and you'll know immediately if something is wrong.
Elbow flaring out vs. staying tight to the ribcage
If your elbow points out toward the wall during the pull, you're shifting the work from your lats to your upper traps and rear delts. That's not bad if you want upper back work, but it means you're not getting the full lat engagement most people want from this exercise.
What the correct path looks like. Your elbow should travel backward along a line roughly parallel to your torso. Think of it as rowing the elbow, not the hand. The dumbbell follows naturally.
Pulling too high vs. stopping at the right spot
Another common mistake is pulling the dumbbell too high, up toward your armpit or chest. That engages your traps disproportionately and reduces lat activation.
The right spot: The dumbbell ends at your lower rib or hip pocket. If you're pulling to your armpit, you're either using too much weight and compensating with momentum, or you're mistaking this exercise for an upright row variation.
Quick fix: Imagine you're starting a lawnmower with a pull cord. The motion is horizontal and back, not up. You pull the cord toward your hip, not your shoulder.
Same idea here.
4 Common Mistakes That Kill Results (or Cause Injury)
You can do everything right on the setup, but one bad habit can undo all of it. These four mistakes are the most common reasons people stop feeling the single arm dumbbell row in their back.
Mistake 1: The body rotation cheat
This is the number one form breaker. As the weight comes up, the lifter twists their torso, rotating the shoulder toward the ceiling. That allows them to pull the dumbbell higher using momentum and trunk rotation instead of back strength.
If you watch yourself from behind, your shoulders should stay square to the floor throughout the entire rep. If your working-side shoulder rotates up and back toward the ceiling, you're cheating.
The fix: Lighten the weight until you can complete 12 reps without any torso rotation. Film yourself from behind. If your belt line or shirt logo twists, you're rotating.
Keep your ribs planted toward the floor.
Mistake 2: Shrugging instead of rowing
The shoulder blade should glide toward your spine during the pull. What many people do instead is shrug the shoulder upward toward their ear. That turns a back exercise into a trap exercise.
Shrugging happens most often when the weight is too heavy and the lifter tries to "muscle" the weight up using their upper traps. It also happens when people confuse the row with an upright row or a clean pull.
The fix: Before you pull, consciously push your shoulder blade down and back. Maintain that position throughout the movement. If you feel tension climbing up toward your neck, lower the weight.
Mistake 3: Dropping the chest or rounding the lower back
This is the most dangerous mistake. When fatigue sets in near the end of a set, the lower back often rounds. The hips drift up, and the chest drops toward the floor.
In this position, the spine loses its neutral curve, and the discs in the lower back take on shear stress they aren't designed to handle.
The fix: If your lower back starts to round, stop the set immediately. No rep is worth a lumbar injury. Reset your position, brace your core, and finish with lighter weight.
If rounding happens early in the set, your starting weight is too high.
Mistake 4: Using momentum instead of muscle
Swinging the weight up, letting it drop, and catching it at the bottom is not rowing. That's a momentum transfer. You might be able to move more weight that way, but your back muscles aren't doing the work.
The fix: Use a 2-1-2 tempo. Two seconds up, one second squeeze, two seconds down. Count it out.
If you can't control the negative, the weight is too heavy.
How to Choose the Right Weight
This is where most lifters get it wrong. They pick a weight that feels challenging on the first few reps, then their form falls apart by rep eight.
Rep ranges for strength, hypertrophy, and endurance
Goal Rep Range Weight Selection Rest Between Sets
Strength 4 to 6 Heavy, last 2 reps are a grind 2 to 3 minutes
Hypertrophy 8 to 12 Moderate, last 3 reps are hard 60 to 90 seconds
Endurance 15 to 20 Light, no form breakdown 30 to 45 seconds
For most people looking to build back thickness, the 8 to 12 rep range works best. It gives enough volume to stimulate growth without the technical demands of very heavy sets.
The "controlled failure" rule for loading
Here's a practical rule from collective coaching experience. Choose a weight where you can complete your target rep range with perfect form on the first two sets. On the third set, you should reach technical failure at rep 10 or 11 for an 8 to 12 target.
Technical failure means your last rep starts to slow down or the form wavers slightly. You don't need to grind to absolute failure.
If you can complete 12 clean reps on all three sets, increase the weight by 5 pounds next session. If you can't get 8 clean reps on the first set, drop the weight by 5 pounds.
Dumbbell Row Variations Worth Knowing
The single arm dumbbell row is the gold standard, but variations exist for a reason. Here's how they compare.
Single arm vs. two-arm dumbbell row
The two-arm dumbbell row (also called the bent-over dumbbell row) uses both arms at once. You stand with a dumbbell in each hand, hinge at the hips, and row both weights together.
The trade-off: The two-arm version allows for heavier loading but puts more stress on